The AXAF High Resolution Mirror Assembly was described
in issue number 2 of the
AXAF News (August, 1994), along with details of its fabrication and assembly.
The mirror elements were completed at Hughes Danbury Optical Systems in early
1995, about four months ahead of schedule. Exceptionally smooth surfaces
were achieved, approximately 3 Å rms in the 1-1000 ![]() band.
The expected performance of the mirror elements exceeds the contractual
specifications and goals at essentially all energies. This is
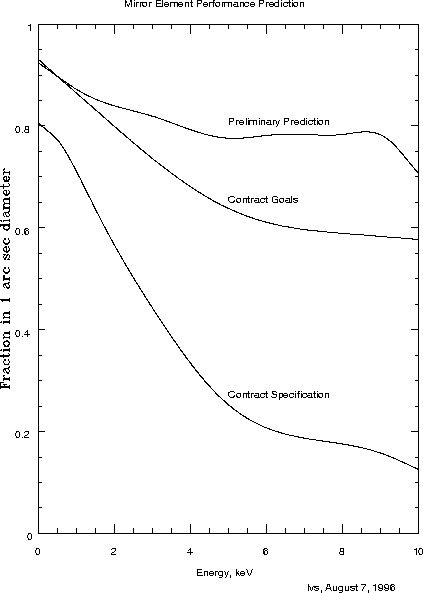
illustrated in Figure 1, which shows the fraction of
the encircled energy which would be contained in a one arc second diameter
aperture if the only loss of performance were due to the imperfections
of the mirror elements (perfect assembly, pointing, etc.). The contractual
specification and goals for this parameter also are shown as smooth curves,
although formally the performance is specified only at selected energies.
Many individuals at HDOS made important
contributions to this program; those of Paul Reid, Matt Magida,
John Patterson, and Tom Gordon are particularly noteworthy.
band.
The expected performance of the mirror elements exceeds the contractual
specifications and goals at essentially all energies. This is
illustrated in Figure 1, which shows the fraction of
the encircled energy which would be contained in a one arc second diameter
aperture if the only loss of performance were due to the imperfections
of the mirror elements (perfect assembly, pointing, etc.). The contractual
specification and goals for this parameter also are shown as smooth curves,
although formally the performance is specified only at selected energies.
Many individuals at HDOS made important
contributions to this program; those of Paul Reid, Matt Magida,
John Patterson, and Tom Gordon are particularly noteworthy.
The mirror elements were taken to Optical Coating Laboratory, Inc. (OCLI) for Iridium coating after the completion of the mirror fabrication at HDOS; this activity was described by Suzanne Romaine in the last issue of AXAF News (number 3, September, 1995). This activity also was quite successful; measurements on witness flats indicate no degradation of the optical surfaces and a coating density greater than 98% of bulk density. Gerry Johnston, Bob Hahn, and Andrew Longmire were among the key contributors at OCLI.
The mirror elements currently are in the final assembly process at the
Eastman Kodak Corporation (EKC). This activity is being performed in
a large vertical tower which is clean (better than class 100) and thermally
stable to an accuracy of about ![]() C. The mirror elements,
composite support sleeves, and aluminum center aperture plate
are all supported in a nearly strain free manner. The optical alignment
system illuminates the mirror from near its focus; light is successively
reflected from the hyperboloid, the paraboloid, an auto-collimation flat,
the paraboloid and hyperboloid again, and returns to a quad cell
detector near the focus. The software does a fourier
decomposition of the centroid coordinates as a function of the
azimuth angle illuminated; the zero theta components correspond to
lateral focus errors, the one theta component is proportional to the
axial focus error, and the two theta components indicate the alignment
errors between the paraboloid and hyperboloid of an individual mirror
pair. These image components are measured, and the mirror elements
are manipulated to reduce the errors to an acceptable value. Higher
azimuthal frequency terms also
are measured to detect distortions introduced by errors in the mirror
support system. The mirrors are bonded after satisfactory alignment is
achieved. This is actually performed in two steps; first small area
``tack'' bonds are made at three flexure locations and allowed to cure
for about one day; then the main bonds are injected at all twelve flexure
locations, and the final bonds are allowed to cure for five days before
being required to support the mirror elements.
C. The mirror elements,
composite support sleeves, and aluminum center aperture plate
are all supported in a nearly strain free manner. The optical alignment
system illuminates the mirror from near its focus; light is successively
reflected from the hyperboloid, the paraboloid, an auto-collimation flat,
the paraboloid and hyperboloid again, and returns to a quad cell
detector near the focus. The software does a fourier
decomposition of the centroid coordinates as a function of the
azimuth angle illuminated; the zero theta components correspond to
lateral focus errors, the one theta component is proportional to the
axial focus error, and the two theta components indicate the alignment
errors between the paraboloid and hyperboloid of an individual mirror
pair. These image components are measured, and the mirror elements
are manipulated to reduce the errors to an acceptable value. Higher
azimuthal frequency terms also
are measured to detect distortions introduced by errors in the mirror
support system. The mirrors are bonded after satisfactory alignment is
achieved. This is actually performed in two steps; first small area
``tack'' bonds are made at three flexure locations and allowed to cure
for about one day; then the main bonds are injected at all twelve flexure
locations, and the final bonds are allowed to cure for five days before
being required to support the mirror elements.

Figure 1:
The predicted performance of the mirror elements exceeds its
specification and is comparable to or better than the
contractual goals. The figure shows the predicted fraction of the
transmitted energy which would be contained in one arc second if there
were no degradation caused by the mirror assembly and other sources
of error; smoothed curves through the points of the specification and goals
are given for comparison.
Some of the above procedures reflect the lessons learned during the VETA-II exercise, which consisted of aligning and bonding the largest pair before coating; these elements then were debonded, and sent to OCLI for cleaning and coating. For example, the tack bond procedure was added because it was found that the mirror manipulation devices could not overcome the viscous forces which resulted from the complete bonds. There also is less chance of introducing an alignment error during the injection of the small tack bonds than would exist for the much larger complete bonds. The tack bonds are sufficient to maintain the mirror positions during the final bond injection. The tack bond injection takes about 15 minutes, and the mirror alignment can be adjusted for about two hours after the injection; the process can be aborted (and the bond areas cleaned for a retry) up to about four hours after the injection. Mirror correction after four hours would be possible, but would have a major impact on the program. Fortunately, we have not had to make any mirror adjustments after the tack bond injections.
At this time, all four of the paraboloids have been bonded into the assembly, and also the two inner hyperboloids. Two anomalies have occurred. The alignment of H6 degraded during the cure of the complete bonds, the effect being about 0.5 arc seconds in image diameter for this pair. The cause of the degradation is not totally understood, but plausible arguments were made which attributed the effect to asymmetries in the tack bond locations and variations in the gaps provided for the epoxy bonds. The procedures were modified to reduce these asymmetries. The assembly sequence was modified to install all of the paraboloids before the next hyperboloid; similar errors in the paraboloids could be corrected by the subsequent hyperboloid installation, and this also provided additional time to study the problem. Fortunately, no similar problems were encountered with the paraboloids, thus providing evidence that the corrective measures are adequate. The next hyperboloid, H4, has now been aligned and bonded, and no similar degradation was observed. This mirror alignment is better than its specification in the internal alignment of P4 and H4, and also in the lateral alignment between the two focii of the P4H4 and P6H6 pairs. There was, however a small apparent focus shift which occurred when the support of H4 was transferred from the mirror alignment system to its internal flexures; this has been shown to result from the optical system response to the local distortions caused by the flexures in the earth's gravitational field. The sensitivities of the apparent focus axial location to certain lights in the tower, to the air flow in the tower, and to different configurations of the contamination control covers also were greater than expected; these effects are believed to be a consequence of temperature gradients in the air path inside of the mirror cavity. Our present best estimate of these effects is that the focii of mirror pairs 4 and 6 are separated by about 0.45 mm axially. The focus target for mirror pairs 3 and 1 will be adjusted to be 0.1125 mm from the focus of mirror pair 4, and therefore 0.3375 mm from the focus of mirror pair 6. This will result in an image diameter contribution of about 0.44 arc seconds for mirror pair 6, and 0.20 arc seconds for mirror pair 4. Fortunately, the achieved alignment in some of the other areas has introduced smaller errors than had been budgeted.
The current schedule will result in H3 being bonded on about August 23, and the final H1 bond occurring during the second week in September. Mirror delivery currently is expected on November 18, about two weeks behind schedule; efforts are being made to reduce the time required for the post alignment activities, and hopefully some schedule recovery will be obtained.
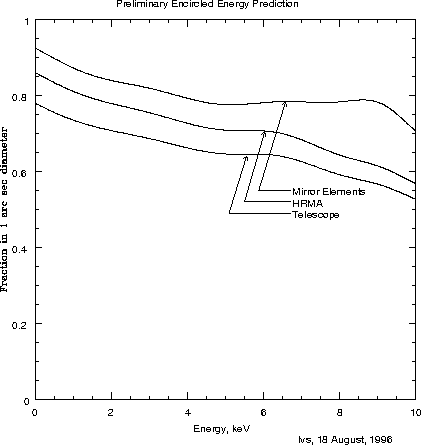
The final mirror imaging performance will depend upon the quality of the alignment, and also upon the aspect system, high frequency vibrations of the optical bench, changes in the spacing between mirror and focal plane, and other minor effects. The effects of these additional sources of error (including the axial focus errors described above) on the fraction of the energy expected in one arc second are shown in Figure 2. This superior performance will enhance the scientific return from AXAF; sensitivity will be improved, and there will be less confusion in dense regions or by emission from adjacent parts of extended sources. The expected modest variation of the performance as a function of energy will reduce the uncertainties which accrue from using calibration data to infer results for sources with different spectra. We eagerly await the testing of these predictions at the MSFC X-ray Calibration Facility.

Figure 2:
Mirror assembly, aspect, and other errors also contribute to
the final telescope performance. The top curve shows the predicted
fraction of the transmitted energy which would be contained in one arc second
if there were only mirror element errors; the middle curve shows the
degradation caused by the currently expected assembly errors, and the lowest
curve shows the added degradation due to the specified aspect system and other
telescope level effects.
Leon van Speybroeck